|
A Frog-shaped Needlecase
Reproduced from an original in the Los Angeles County Museum of Art
|
 |
| copyright L. Mellin, 2008 |
|
|
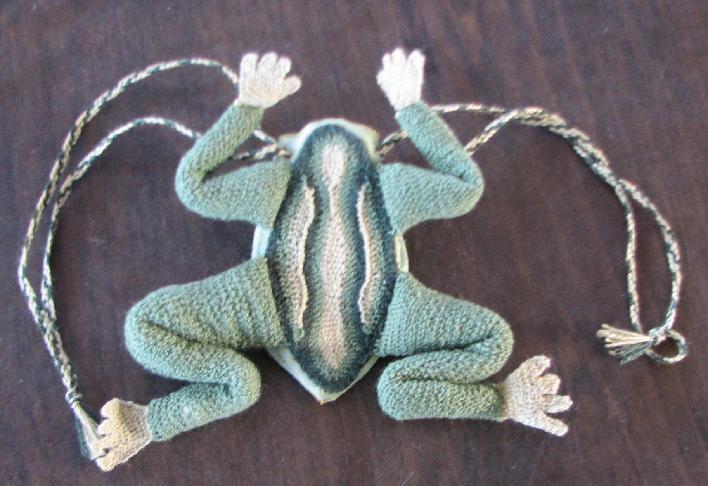
This needlecase is based on an early 17th-century original in LACMA; I was enchanted by the scale of the original, and wanted to play with the needle lace skills I had been using on the Plimoth Jacket project. The size of the project seemed manageable, and in the end only took 81 hours, not counting design and mock-up time.
|
I started with a close examination of the picture of the original (I have never seen the original close-up; it is not currently on display, and I have been to California all of twice in my life). The colours are faded, but they do seem to be three shades of green, and the legs and body appear to be worked on a wire armature, like this frog purse in the Museum of London. While I am guessing about the wire legs, my experiments indicated that the only way to get a bend like the original is to mount the legs on wires.
What little can be seen of the fabric of the case appears to be a green silk taffeta that matches the shade of the embroidery silk used on the legs. The ties look like they have been broken short, and were once much longer (which would fit not only with LACMA's description of the case being hung from the waist, but also matches the long strings of objects worn by the women in the Album Amicorum of a German Soldier, also at LACMA). The strings may have been fingerloop braided; they are silk, like the rest of the case.
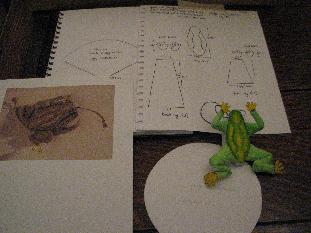
I took note of the original measurements (13/4 x 2 inches), and drafted a pattern and then a mockup in waste fabric of the pattern, to check on the sizing and proportions. My finished beastie is 21/2 x 3 inches, so slightly bigger than the original. In part this is because I used a printout of the original picture to get the proportions of the body correct, and in part it is because I was sloppy. My next try will be smaller.
|
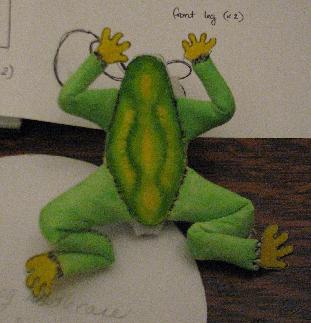
The mock-up worked very well - it allowed me to play with the wire armature of the arms and legs, and test the size of the paws. Instead of working the body on a wire like the original, I chose to sew it to a piece of stiff paper with silk pasted on top instead, which allowed me to work the needle lace without worrying about stitching over wire, and allwed me to keep the shape consistent (this being my first try). Another example of silk mounted on stiff paper for stability can be seen on the appliqued gown in Janet Arnold's Patterns of Fashion.
I painted (stained, in 17th century parlance) the mockup so I could have a vague idea of what the final piece would look like without 400 years of fading. I did go for slightly more subdued colours that were closer to the period greens, but I wanted it to look vibrant and new, not like it was 400 years old.
|
The embroidery stitch is detached buttonhole stitch. There are two styles of this stitch; one uses an extra thread under the stitch to add body to the line, and always goes one way, whereas the other does not have the extra thread, and goes back and forth (both of these stitches tend to be called needlelace). The stitching on the LACMA frog is so small that it seemed to be the latter, and experiements with both styles confirmed the look of the second style (back and forth) was identical to the original frog.
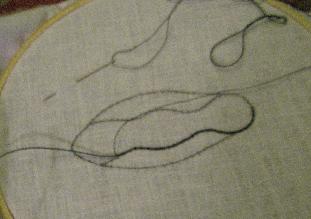
I drew out the pattern onto a waste fabric of cotton/linen blend, and couched the outline in silk thread, then filled in the center without picking up any of the waste fabric. This allowed me to cut away the finished embroidery completely by simply snipping and unpicking the couching thread.
|
Images of the work in progress - click on the thumbnails for a larger picture:
|
Notes on the embroidery:
The couching stitches need to be very close together - they basically hold the shape of the piece as you work.
Be careful not to catch the waste fabric as you work, and be careful not to pull the stitches too tight, as this will distort the finished piece.
Leave all thread ends loose until the embroidery is cut away from the waste fabric; for all pieces except the paws, the thread can be worked into the back of the embroidery and then cut.
Work with long threads (which requires a good silk twist; I very slightly beeswaxed mine before sewing); the fewer stop and start points there are, the more even the embroidery will be. This is especially important for the paws, which sit alone; they need to be worked with one long piece of thread, as the front and back will both show.
Construction:
Once the embroidery was completely done, I started on the construction. The base is the bag, which I made from double-shot ("changeable") Dupioni silk taffeta. The bag is not a perfect circle; the pattern pieces are actually fan-shaped, which allows the neat closure of the bag without too much extra fabric. I sewed the bag together - hemmed each piece, and sewed them together, leaving lining and shell temporarily separate. I put those aside, and constructed the body by pasting some of the same silk as the bag to stiff paper cut in the shape of the body embroideries (this required some careful trimming once the silk and paper were pasted together). The glue I used was an acid-free adhesive; in period, anything from a rabbit-skin glue to a starch paste might have been used. I then sewed the pasted silk to the body pieces.
Then, I lined the finished body pieces up on the bag shell in the center of each bag half. I heavily beeswaxed a piece of the darkest silk thread, and stitched the bodies to the bag, making sure the base point on each side lined up (the bag should only barely show once the piece is finished and tied). After the body pieces were in place, I put the lining in and hemmed the top of the lining and shell together in line with the tip og the frog's nose.
The one bad mistake I made was neglecting to measure the line of the top hem of the bag - it is a little bit shorter on the sides than it should be. Fortunately, it doesn't really show.
|
More Construction:
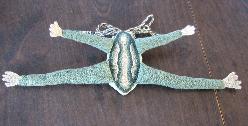
The legs were built around a wire and stuffing. I used a fairly soft jewelry wire (18 gauge), and cotton batting, as I didn't feel up to tearing part a whole bunch of wool. I wrapped the batting around the wire, and then wrapped the embroidered legs around that, adjusting the stuffing as needed. One important thing is that the embroidery can be stretched, so you really need to be careful not to overstuff the legs. One of the back legs on my frog is slightly longer than the other, and looks like he has a small lymph node problem.
Fortunately, once the legs were bent, the difference wasn't too noticeable.
Once the legs were sewn around the stuffing, the paws were added on each end, with the thread ends tucked into the top of the leg. If I did this again, I would angle the back leg where it is attached to the body - the legs on my reproduction stick out more than the original.
I braided the ties from the same embroidery silk I used for the needle lace, making one looped tie for each side of the bag, so that there is no bulky tie under the body of the frog. I then folded and marked the bag fabric so that when the bag is tied together, the fabric doesn't show at the top, and only puffs out a little at the frog's "tummy" section.
Finally, I added a little strip of wool inside the bag, as steel needles keep best tucked into wool (the residual lanolin helps to prevent rusting):
|
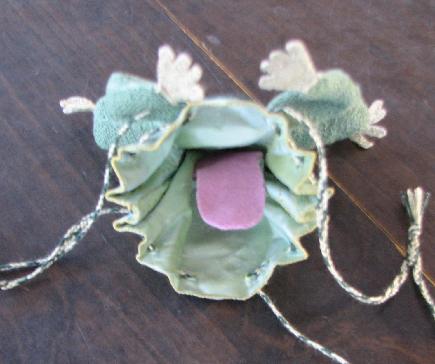 |
| Boo! |
|
|
(The original does not have a tongue, as far as I know.)
I really enjoyed making this little creature - I don't know if anyone else has done a reproduction of him (if you have, please let me know - I'd love to link to it!).
As I said, he took about 81 hours to make (30 hours longer than my original estimate of 50 hours), and cost me about $30 (mostly for the silk), which I got from Hedgehog Handworks and Halcyon Yarn.
He was an excellent in-between project to work when I need a rest from my 1000+ hour projects.
|
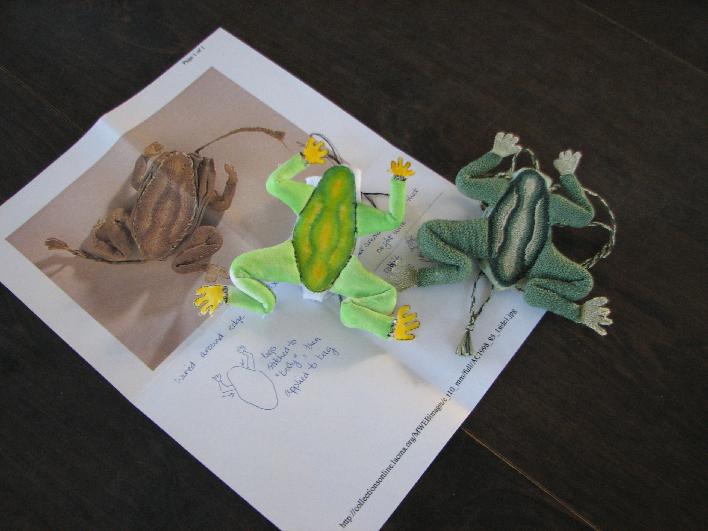 |
| Left to right: The original, the mock-up, and the reproduction. |
|
|
|